Objectives Students will demonstrate understanding of rotoscoping
as an animation technique by creating a self-portrait with Photoshop
and a short animated clip. Students will attend to continuity
in their style of rotoscoping.
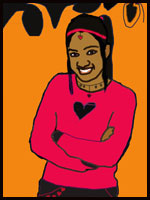
One of the basic concepts in rotoscoping is that the animation will
be created in a different layer from the original picture. For students
to learn this concept have them first create a rotoscoped self-portrait
in Photoshop.
Rotoscoping
Self-Portraits with Photoshop Photoshop
is a multilevel, comprehensive editing program that is used not just
by animators but also by graphic designers, illustrators, photographers,
and other visual artists.
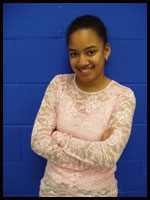
Take a digital photograph of each student and make
sure to keep the background simple (for example, a blank wall).
Download photograph to folder in computer desktop
where original and Photoshop files will be saved.
Open Photoshop.
Click File Menu > Open image. Note: If picture
was taken vertically make sure to rotate image by Image Panel
> Rotate Canvas.
Make sure that your Layer and Tool windows are
open (found in Window Panel). Your photograph should be the only
layer, named background, and locked (Lock sign is located on the
right side. To unlock double click on layer and enter OK).
Create a new layer. Layer Panel > New > Layer
or Click on triangle symbol found in the top right corner of the
Layers Window. In the pop menu select New Layer. Note: you can
also Delete or Duplicate Layers.
Making sure that the new Layer 1 is selected (blue
highlight) begin creating a contour drawing of yourself. Use Brush
or Pencil Tool (B keyboard shortcut), use Black Color, and you
can also select different brush diameters near the top left corner.
To view in-progress contour image, click on the
eye symbol located in your background layer. This causes the original
photograph to disappear and allows you to see only Layer 1.
Once your contour has been created you can Choose
Paint Bucket Tool (G keyboard shortcut) and fill in the different
parts of yourself. The two color boxes near the bottom of the
Tool Window also known as the Color Picker allow you to change
the background and foreground colors.
To include a new background for your rotoscoped
self-portrait, insert a New Layer. Make sure that Layer 2 is underneath
Layer 1 in the Layer Window. To move layers, click > hold >
and drag layer to new location.
Fill Layer 2 with Paint Bucket Tool. Once layer
is filled you can also apply Styles (located in Windows Panel).
You may choose to delete (Step 6) the original
photograph by selecting background layer in Layers Window. Make
sure it is unlocked!
File Menu > Save As. Save your final cartoon
in JPEG and PSD formats (psd file will be a backup in case you
decide to go back and change afterwards.)
Edit Panel > Undo will allow you to undo
the last move. Note: the History Window will allow you to undo
back to original image!
Zoom in and out according to how accurate
and detailed you want your self-portrait to be. (To zoom use Zoom
Tool or Ctrl/Command + or -)
Sometimes bleeding occurs when you try to
fill a section because is not completely enclosed. To fix, click
Undo, and then make sure that all lines in the section are closed.
Rotoscoping with Flash
There are many ways to do rotoscoping. No matter what program is chosen,
the original clip will be recorded with a digital camcorder, then
edited with a non-linear video program, and then rotoscoped frame
by frame. Since rotoscoping requires massive amounts of drawing, sketching
and developing a style in advance is highly recommended to save time.
Style: What type of drawing will you do? Experimenting
in advance is encouraged to develop a style that you can consistently
replicate throughout the animation.
Color: You will be re-drawing the action but
it does not have to be the same color. What happens when the hue
is changed?
Time: This can be a very time consuming process,
so do not pick a drawing style that will take you 30 minutes per
frame to complete.
Audio: How does the role of audio in your animation
affect the style and pace?
Continuity or discontinuity in drawing style.
When opening a movie to draw onto, be sure to set 'every 2nd'
frame if you want 15fps (15fps is recommended) or 'every 3rd frame'
if you want 10fps (10fps will mean fewer drawings, but the movement
will be noticeably more jumpy as well.)
Remember to save often for Flash may quit unexpectedly and you
cannot afford to loose all the work you have already done!
Export your final animation it into a QuickTime Movie.
Evaluation Instructors may evaluate this project using the
general rubric provided. Select or
add criteria depending upon the needs or levels of your students,
and/or other curricular concerns. This lesson
introduces new terminology and technology therefore instructors
should give a quiz about vocabulary such as rotoscoping and continuity,
as well as about the new software and its uses. In addition
to that formal final assessment I encourage teachers to consult
with students often during the process to ensure progress, and to
conduct informal, in-progress assessment thinking about questions
like these:
How reflective are students regarding their technique and design
decisions?
How well are students able to explain the concept and style
involved in their production?